Open top menu
Showing posts with label Blogger Tricks. Show all posts
Tutorial # 35 - Numbered Comments on Threaded Comments for Blogger/Blogspot

This tutorial helps you to understand how to add numbered comments with comment bubbles on the threaded comments as shown in the picture below:

This will help you to specify any comment using its 'reference' number.

Step 1: From your Blogger Dashboard, go to Template and click on the Edit HTML button:

Step 2: Click anywhere inside the code area and press the CTRL + F keys to open the Blogger's search box. Type ]]></b:skin> inside the search box then hit Enter to find it.

Note: you might need to click on the arrow next to it to expand the code within and then you need to search ]]></b:skin> one more time.

Step 3: Just above ]]></b:skin>, add the following CSS code:

- If you want to have no bubble icon, remove lines # 12-18.

- To change the comment bubble, replace the URL with the URL address of your own icon. [URL address of bubble/icon will be made by inserting it somewhere in your blog and then right-click on it and click on "Copy image address". Then the address will be saved in your clipboard which can be used to replace the URL in line # 14 of the above CSS code. After doing so, you may remove the picture inserted.]

- To change the position of comments count, increase/decrease the values (10 & 3) from padding-left and padding-top in lines # 12 and 13 respectively

- To change the position of comments bubble/icon, change the values (7 & 10) from margin-top and margin-left in lines # 15 and 16 respectively.

- To change the font and color of the comments count, change the values in lines # 10, 11 and lines # 27, 28.

Step 4: Now Save the Template and you're finished!

Read more
Tutorial # 34 - How to Create Drop Caps (Big First Letters) in Blogger/Blogspot

This tutorial will help you to enlarge the first letter of posts and comments which stretches down three or four lines with the text wrapped around. That letter is called as "Drop Cap" The drop cap letter can also use a different font and have a different color from the rest of the text. This style can be often seen in newspapers, and magazines.


For Posts

Step 1: From your Blogger Dashboard, go to Template and click on the Edit HTML button:


Step 2: Click anywhere inside the code area and press the CTRL + F keys to open the Blogger' search box. Type ]]></b:skin> inside the search box then hit Enter to find it.

Note: you might need to click on the arrow next to it to expand the code within and then you need to search ]]></b:skin> one more time.

Step 3: Just above ]]></b:skin>, add the following CSS code:

Font size and color can be edited by amending the lines # 5 and 6 respectively.

Step 4: Now search for this code: <data:post.body/>

Step 5. Then immediately before and after add the red fragments you see in the example below: <div class='capital'><data:post.body/></div>

Step 6. Save the changes by clicking on the Save template button

Note: If the above code is not working, add one of following codes from this example: <p class="capital"><data:post.body/></p> OR try this instead: <span class="capital"><data:post.body/></span>


For Comments

Step 1: Follow the above Step 1, 2 & 3 (if you have already added the CSS code, skip above Step 2 & 3)

Step 2: Then Search for this piece of code:<data:comment.body/>

Step 3: Add <p class="capital"> before and add </p> after the above searched code

Step 4: Save your Template
Read more
Tutorial # 33 - How to add Calender Dates Next to Blogger Posts

If you want to have a calendar style dates next to your Blogger posts, you need to look no further than this blog. In this tutorial, we'll learn how to create a calendar style for your Blogger posts date!


Step 1: Go to "Settings" > "Language and Formatting" - "Date Header Format" and change the date format as you can see in this example below (first add day, month and then year)

Step 2: Go to Template > click the "Edit HTML" button

Step 3: Click anywhere inside the code area and press CTRL + F to open the blogger' search box

Step 4. Type or paste the following line inside the search box and hit Enter to find it:
<h2 class='date-header'><span><data:post.dateHeader/></span></h2>

Step 5. In case you find it twice, replace it twice with this code:
<div id='Date'>
<script>changeDate(&#39;<data:post.dateHeader/>&#39;);</script>
</div>
<b:else/>
<div id='Date'>
<script>changeDate(&#39;&#39;);</script>
</div>

Step 6. Now type this tag inside the search box and hit Enter to find it:
</head>

Step 7: Just above the </head> tag, paste this code:


Before saving the Template, here we can make some changes:

- To change the calendar style, replace the url in line # 22 with yours;
- If the calendar doesn't appear as it should, change -108 line # 27 with 0;
- Lines # 38, 46, 53 where you can change the color of the dates

Step 8: Now Preview your Template and if everything looks ok, hit the Save Template button.


Read more
Tutorial # 32 - Add Social Media Icons to Blogger Header

This tutorial will help you to add social media icons in the top right corner of the page which could increases the likelihood that readers can follow through the various social networks. The icons will rotate when you hover over them.

Step 1: Go to Blogger dashboard > Template > Edit HTML


Step 2
To expand the style, click on the small arrow on the left of <b:skin>...</b:skin>,


Then click anywhere inside the code area to search (using CTRL + F) for the ]]></b:skin> tag

And then add the following code just above it

Step 3: Now search for this line


Step 4: And just above it, add this code


Step 5: Following changes shall be made by you
- Change usernames at lines 4, 6, 8, 10 with your usernames and id: the first is your Facebook username, the second is that of Twitter, in the third you should change the X by the ID of your Google+ profile and in the fourth you will put the name of your blog.
- To change the icons, just replace the urls in the above mentioned lines with the ones of your images.
- You can add more icons if you want, you just have to add before </ul></div> a line like this for each extra icon you want with a Link URL and Image URL:


Step 6: Finally, Save the Template to apply the changes.
Read more
Tutorial # 31 - Social Media Sharing Widget using AddThis

Without any doubt "Sharing is Caring", those who care and like you posts intent to share them to their social media profiles. This widget helps them to share your content and to make it available to other people. This in turn will promote your blog.


There are many ways to add the social media sharing widget in your blog. However we are using "AddThis" to add different types of social sharing widgets in your blog.

Step 1: Visit the https://www.addthis.com/get/sharing page & Click on "SIGN UP FOR ADDTHIS"

Step 2: Create an account in AddThis. You may also log in through Google, Facebook or Twitter accounts

Step 3: Click on "TOOLS"

Step 4: This will provide you with a number of different types of social sharing buttons. We're going to have Floating Sharing Sidebar

Step 5: You will have some settings regarding your social sharing buttons
Changing the settings doesn't affect the code given below. Before pressing the button "Activate" you need to copy the code and paste it just above <div class='post-footer'> in Template > Edit HTML.

If you want to edit or change the settings of the widget, you just need to your account and amend the setting without making any changes in your blog.

Related Tutoriols
Tutorial # :
Tutorial # :
Tutorial # :
Read more
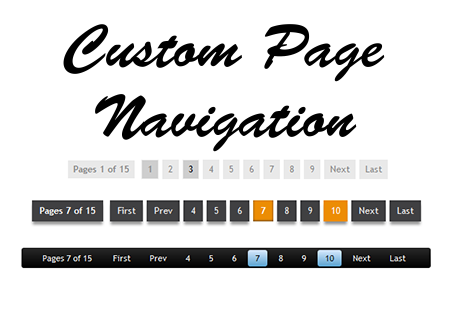
Tutorial # 30 - Custom Numbered Page Navigation Widgets for Blogger

You may have a customized Numbered Page Navigation Widgets. In this tutorial we are providing you various types of page navigation. These can be inserted in your blog by following the steps given below.

Step 1: Go to Blogger Dashboard > Template > click on the Edit HTML button

Step 2: Click anywhere inside the code area and press the CTRL + F keys to open the Blogger search box. Then search for the following tag


Step 3: Now choose one of the numbered page navigation styles given below and copy the code and paste it just above the code.

These are the following codes for page navigation widgets along with their designs:


Step 4: Now find (CTRL + F) this tag:


Step 5: Add the following script just above it:


After installing, you might want to change these default settings:


1) perPage: how many posts will be shown in each page (7). This value has to be the same as the number of posts on the main page. Otherwise, add the same number by going to "Settings" > "Formatting" and type it in the "Show at most" field, then click on the "Save Settings" button.
2) numPages: how many pages will be shown in the page navigation (6)

3) to replace the 'First', 'Last', "« Previous" and "Next »" texts, just type your own within the quotes.


Step 6: Click on the Save Template button and you're done.


Read more
Tutorial # 29 - Custom Search Boxes for Blogger

Step 1. Go to Layout > click on the 'Add a gadget' link on the left side

Step 2. Choose HTML/JavaScript from the pop-up window > paste any of the codes of the search box given below inside the empty box

Step 3. Press Save


These are the following Codes for Search Boxes along with their designs:
Formal 1

Formal 2


Fancy 1


Fancy 2


Fancy 3


Fancy 4


Read more
Tutorial # 28 - Omega: jQuery Image Slider Plugin For Blogger

In Tutorial # 25 we have learnt how to make simple image slider as shown in our home page. Now we are moving forward to next level as in this tutorial we will be having a beautiful image slider for Blogger / BlogSpot made with jQuery and, of course, with HTML and CSS. This slider is known as Omega Image Slider.

It is a lightweight jQuery plugin that will display multiple images in a limited space using navigation arrows (previous-next buttons). On the upper left of the slideshow, we have some small bullet icons indicating the current image that we are viewing and, on the upper right side, is the pause option and a timer letting us know when the next image will be displayed.

Step 1: Go to Layout Template, click on Edit HTML


Step 2: Click anywhere in the code area and press Ctrl-F to open blogger's search box

Step 3: Then search for: 

and just above it add the following code:


Step 4: Then search for:

and just above it add the following code:


Step 5: Click on the "Save template" button to save the changes


Step 6: Use the HTML/JavaScript Gadget to include the slideshow wherever you want

Now we have the option to add the slider either inside one of our posts/pages, or display it as a gadget on the blog' sidebar or below the header. If you choose to add it inside one of your posts, switch to the HTML tab and paste the code below inside HTML box of your post. If you want to add it in the blog sidebar/below the header, go to "Layout", click on the "Add a gadget link" > choose "HTML/JavaScript" from the pop-up window and paste the following html code inside the box:


Step 7
This code contains the images, links and descriptions for each image. The URLs of the links and images that you need to replace with your own. Inside the HTML code of each image, you have the size of each picture that can be changed by modifying the width (590) and height (348) values. To add the description for your pictures, replace the text in red.

If you want to add more pictures, add this HTML before the tag:

Notice that each image and description has an unique identifier (id) and shouldn't be repeated. For instance, in the description text of the first image, we have the id="photo1" and within the image code is the "rel" attribute with the name of the id, that is rel="photo1".


Step 8: After you added your images, click the "Save" or "Publish" button and that's it Now you can enjoy this cool Omega Image Slider for Blogger
Read more
Tutorial # 27 - How to Center the Blogger Header Image

Without any doubt, header is the most important part of your blog as it describes your blog. The header is also the identity of your blog. By adjusting the positioning of your header, you have greater flexibility over the overall design, and it allows you to really shine light on this content. It's hard to miss a header that is placed smack dab in the middle of the screen on every page that someone navigates to.

Step 1. Go to "Template" and click the "Customize" button on the right side


Step 2. Navigate to "Advanced" > "Add CSS" tab and paste the code in the empty box
Paste the following code over there:
#header-inner {
background-position: center !important; 
width: 100% !important;
text-align: center;
}
#header-inner img {
margin: auto;
}

Step 3. Then click the "Apply to Blog" button and you'll see the effect as shown below


Here are some other aligning options for your headers; you copy any of the following codes according to your needs:

1. Image on the right and title on the left
#header-inner {
background-position: right !important; 
width: 100% !important;

.titlewrapper, .descriptionwrapper {
float: left;
clear: both;
margin-left: 20px;
}


2. Image on the left and title on the right
#header-inner {
background-position: left !important; 
width: 100% !important;

.titlewrapper, .descriptionwrapper {
float: right;
clear: both;
margin-right: 20px;
}
Read more
Tutorial # 26 - Facebook Pop-up Like Widget


Facebook is the No. 1 social media service on the Internet hosting to over 1.3 billion users; of those, 800 million login to their timelines at least once a day. Thanks to the vast number of active users on services like Facebook, acquiring new readers as a blogger or content provider has become easier than ever.

For E-marketing, you must take advantage of social media by doing things like integrating Facebook on Blogger. Sharing site content using a Facebook Like Box is just one of many strategies that can generate a regular flow of traffic from a diverse demographic that might have been previously inaccessible. Adding a Facebook Like Box actually makes the users more likely to like your blog page.

How to Add the Facebook Popup Like Box Widget
Step 1: Log into your Blogger account and select your blog > go to 'Layout' & click the 'Add a Gadget' link on the right side

Step 2: Once the popup window is open, select the HTML/JavaScript gadget from the list

Step 3: Copy and paste the following code inside the empty box


Step 4: Customization
After adding the code, replace the address in Line # , https://www.facebook.com/earningonlineviablog/ with your site's facebook page URL.
The widget will appear 5 seconds after the page finishes loading. If you want to change this delay, change the number 5000 to a greater or lesser number in this part:
.delay(5000)
By default, the like box only shows up the first time the user visits your page.  If you would like the Facebook box to popup every time the page loads, then remove this line of code:
$.cookie('popup_facebook_box', 'yes', { path: '/', expires: 7 });

If you want to display only when user visits your homepage, go to 'Template' > hit the 'Edit HTML' button on the right side and search by clicking anywhere inside the code area and pressing the CTRL + F keys for this tag:

Paste the facebook popup widget right above the body tag and make sure to include the conditional tags below:
<b:if cond='data:page.type == "index"'>ADD THE FACEBOOK WIDGET CODE HERE </b:if>

After saving your work, you can test out your new feature by returning to one of your old posts which should bring up a little popup widget asking if you'd like to join the site's facebook page.

If you don't see the Facebook Like Box on the page, you may need to delete your cookies or check out the 'Customization' section above in order to display the widget every time a user visits your site. Once this widget is added to your site, all your hard work should start to translate into an increase in web traffic and number of Facebook fans.


Step 5: Press the 'Save' button to add the widget to your blog. That's it!
Read more
Tutorial # 25 - Slideshow Widget

There is the code of the slideshow as displayed on our home/landing page.
This is a slideshow widget which needs to be amended a bit according to your requirements. This can be included in either the HTML/JavaScript widget or a post. You need to upload those images which you want to appear them in the slideshow provided the size of the images should be 640px  x  350px (See line # 8). You also need to copy the image links by inserting them and then press right click on them one by one and click on "Copy image address" and paste the links in the lines # 133 - 138. You may add/remove images by adding/removing the links. After doing all this remove the images.


You may make multiple changes in the slideshow like size(ln 8), pause time(ln 104), transition time(ln 105), etc. Try to understand and interpret the HTML code! See Tutorial # 12 - How to write Privacy Policy, Disclaimer, and Terms & Conditions for your site

Read more
Tutorial # 18 - Meta Description and Search Engine Optimization (SEO)

Step 1: Make your blog searchable and 'listed'


Step 2: Go to Setting > Search preferences for further SEO settings. Click on the all the Edits

Step 3: The setting of blogger's search preferences are described  below

If the feature is turned on (e.g., you’ve selected Yes for "Enable search description?"), then you will see "Search Description" option in the "Post/Page Settings" section of the Post/Page Editor as shown in the image below:


You must specify a search description for your blog including each post and page, otherwise search engines will establish one for you based on your blog’s content. This also helps in Search Engine Optimization (SEO). For further guide on SEO, click here

For Crawlers, Indexing and Robots see Tutorial # 19 - Appropriate Use of Custom Robots
Read more
Tutorial # 16 - How to Connect your Google+ Profile or Page


Step 1: Go to the gearing icon at the right top corner, and click on "Connect to Google+"

Step 2:

Step 3

Step 4: Now the blog is connected to your Google+ profile. There are various options regarding posting the blog's content to your profile. You can also connect your blog to a Google+ page.

Step 5: If you want to link your blog to a Google+ page, first you have to create a page unless you already have one.

Step 6

Step 7

Step 8

Step 9

Step 10

Step 11

Read more